Spelunky is a great game. I remember
playing the first freeware version, and sucking at it. I don’t think
I ever got past the Mines. Never owned an Xbox 360, so I wasn’t able to play the
HD remake when it was first released. I shed bitter tears about that. Imagine
my joy when a port was released for PS3 (which I actually owned)! Imagine my
anguish when my PS3 bit the dust, suffering from the dreaded “Yellow Light of
Death!”
While there is a PC version of the game, no OS X port has been released, and
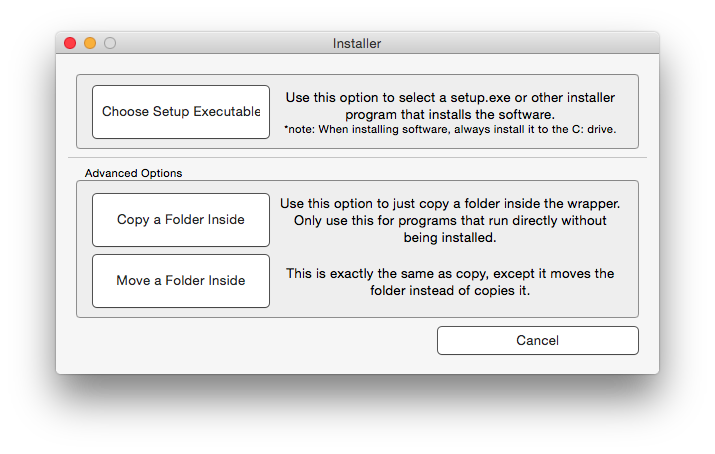
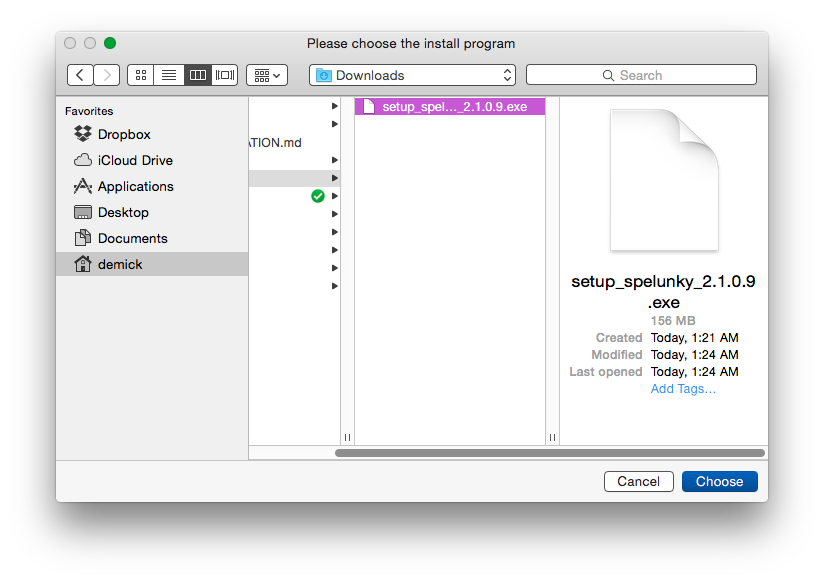
it’s looking rather unlikely at this point. Fortunately, it’s super easy to
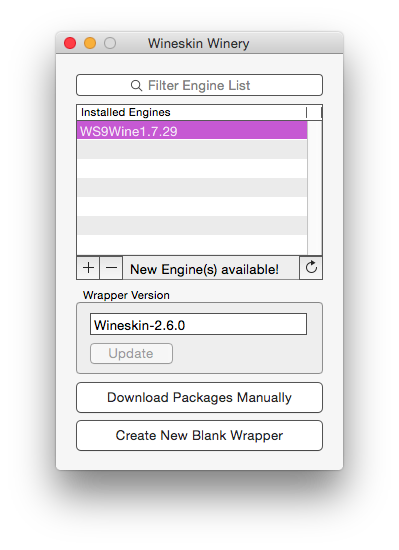
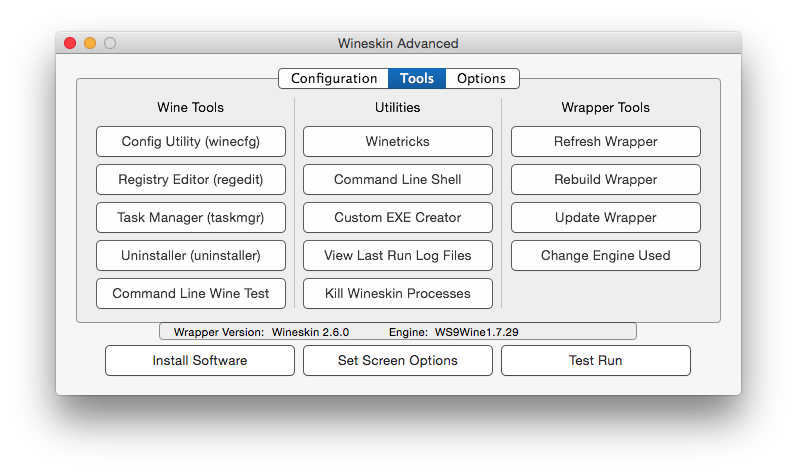
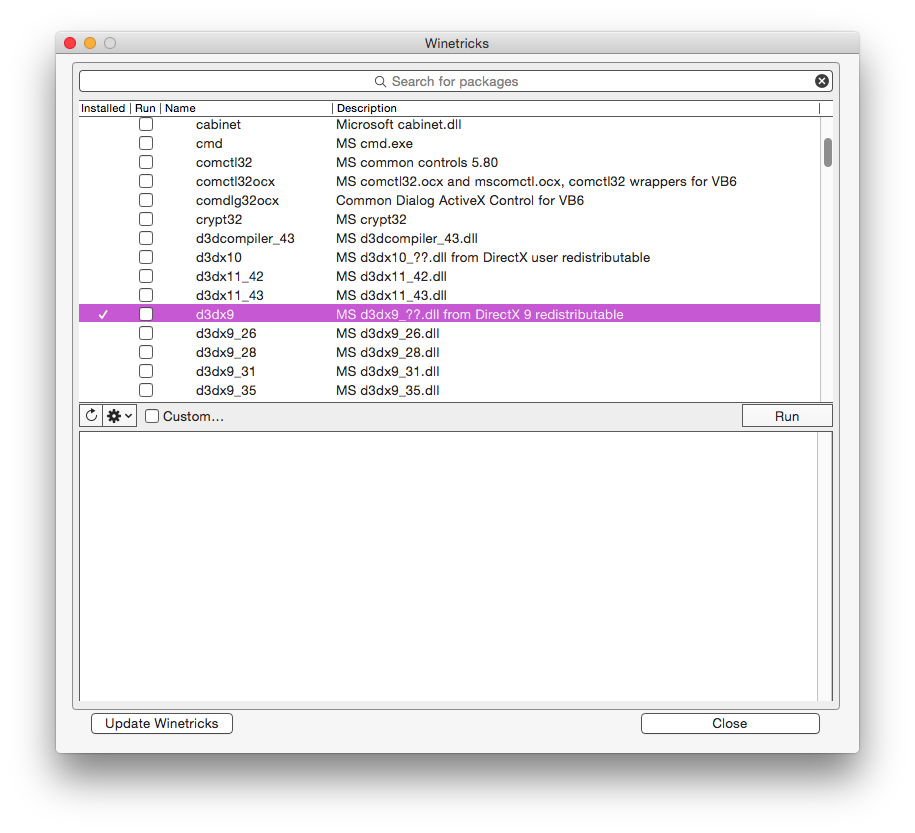
get the Windows version of the game running in Wine! Even better, there’s an
application called Wineskin Winery, which will bundle the Windows .exe into its
own self-contained Mac .app bundle! When you get the whole thing working, it’s
totally seamless and amazing. While I found a few tutorials online to help walk
through the process of getting Spelunky up and running, they were a bit sketchy,
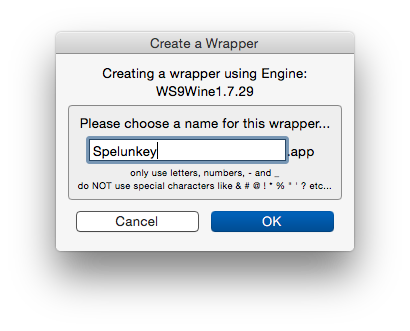
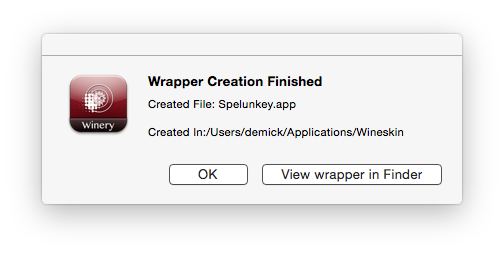
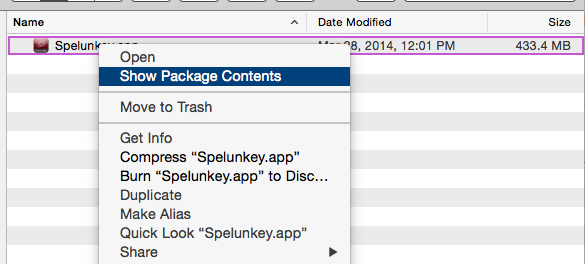
so I figured I’d recount the process here, complete with screenshots. Note that
I’m running the GOG version.
I’ve been using the Lollipop version of Gmail quite a bit recently. One neat
little detail is that whenever you drill down into the individual email view,
the “hamburger” button in the upper left smoothly animates into a “back” button.
In fact, you’ve probably seen this effect quite a lot – a simple search for
“animated hamburger icon”
returns a boatload of results. Most of the techniques for doing this sort of
effect on the web utilize some sort of CSS trickery: they’ll use psuedo-
elements to create the hamburger, then animate it all with transforms.
What if you have to support older browsers in your site? I know it’s hard to
resist the shiny new features in the most recent version of Chrome, but
lots of folks still use (gasp!) IE8 (or older). In fact, one of the sites that
I help administer has an even split of users between Chrome and IE8. For that
reason, I was thinking about how I could implement a hamburger animation in
a way that wouldn’t totally break for IE8 users.
I ended up simply using two images, a “hamburger” and an arrow, then fading
between them. On newer browsers that support transforms, the fade is obscured
by a rotation animation. Sure, it’s hacky; the cooler versions of this effect
will create the hamburger using DOM elements, then animate each one into
position. But most end users won’t notice the difference. And using images
will allow older browsers to get an approximation of the effect.
Have you ever used Capistrano to run Rails’ database migrations in your
production environment? It’s pretty great, just cap deploy:migrations and
you’re good to go. You’ve probably also had to use Capistrano to roll back a
bad deploy, using cap deploy:rollback. But what if your most recent
deployment had a migration that introduced a schema incompatible with your old
code?
Well, if there was only one migration, you could roll it back by using
rake db:rollback RAILS_ENV=production. However, the problem I found
myself in a few months ago was that I had deployed a feature with multiple
migrations. And, it was a long running branch, so the migration files weren’t
the most recent ones run. rake db:rollback would have, in fact, reverted
only a single (and wrong!) schema change.
The correct command to use in these cases is rake db:migrate:down
RAILS_ENV=production VERSION=<UR TIMESTAMP HERE>. Let’s be honest, though.
If you’re rolling back a schema change, you don’t want to mess around with
running these tasks one at a time. In my situation, I had 10 (!) migrations
that needed to be reverted. I ended up rolling them back on at a time, until
one halfway through threw an error. I then realized that the only way out was
through, and fixed the bug that caused the rollback attempt.
So! Resolving to never be in that situation again, I created a simple Capistrano
(ver. 2) task to revert multiple migrations. And I always ensure that all
migrations in any pull request I merge can be run both ways.
desc 'Migrate downwards; Usage: cap db:migrate:down VERSIONS=TIMESTAMP,[...],TIMESTAMP'
namespace :db do
  namespace :migrate do
    task :down, roles: :db do
      ENV['VERSIONS'].split(',').each do |version|
        run "cd #{current_path} && bundle exec rake db:migrate:down VERSION=#{version}"
      end
    end
  end
end
After having pretty stagnant websites costing me $10/month for years and years
on shared hosting, I’m finally in the process of migrating to a VPS hosted by
DigitalOcean. I was pushed
over the edge by the fact that my shared host of 10+ years (Dreamhost) runs
Ruby 1.8.7, and I had no way to upgrade. The prospect of administering my own
web server is a bit daunting, but heck, I write websites for a living, I should
be able to figure it out.
So how does one go about moving one’s digital life?
The one good thing about my shared hosting provider was that they were a
“one stop shop.” I had my domain registration, email, web hosting,
version control, everything in one place. Moving to a VPS means that all my
services are all over the place. Such is life, I guess. Hopefully being able
to run modern webapps for $5/month will make me feel better.
The first step for me was to migrate my old email into my Gmail account, which
I’ve been using for about 10 years. Fortunately, email has an “Import from POP3”
option right in Settings -> Accounts and Import. I grabbed all my old
messages, labeled them, and called it a day.
Next was to move all my crummy, half-baked SVN repositories over to GitHub.
Most of these are pretty worthless, but I’m a digital packrat (as well as physical),
so I followed this tutorial from the Git Book.
I’ll have to go back and delete most of them later, as they are of no use to
anyone, least of all myself.
I moved my domain names over to Google Domains.
Seems a bit sketchy since it’s in the perpetual “Google Beta,” but the offered
email forwarding, and the last thing I want to do is deal with an email server
to handle my legacy email address.
Lastly, I converted my Wordpress blog over to Jekyll,
a static site generator. Conveniently enough, there’s a
Wordpress importer
which I used to grab my existing posts. After installing nginx and Ruby on my shiny new
VPS, I created a Git post-receive hook
to rebuild the site every time I push to the remote repo.
So far it’s been pretty fun to muck around with these things – I feel like I don’t
know nearly enough about system administration, so hopefully I’ll pick up
a few things.
For all the helpful things that Apple added to Sprite Kit, one of the most
glaring omissions is that most basic of user interface elements, the button. Not
really sure why that is, but fortunately it’s pretty easy to create something
that “just works.” The gist of the solution is to create a subclass of the
SKNode class. Since each node in Sprite Kit can contain any number
of other nodes, we just have to create a button container which holds two
sprites: one for the default button state and one for the “active” button
state.
import SpriteKit

class GGButton: SKNode {
    var defaultButton: SKSpriteNode
    var activeButton: SKSpriteNode
    var action: () -> Void

    init(defaultButtonImage: String, activeButtonImage: String, buttonAction: () -> Void) {
        defaultButton = SKSpriteNode(imageNamed: defaultButtonImage)
        activeButton = SKSpriteNode(imageNamed: activeButtonImage)
        activeButton.hidden = true
        action = buttonAction

        super.init()

        userInteractionEnabled = true
        addChild(defaultButton)
        addChild(activeButton)
    }

    /**
        Required so XCode doesn't throw warnings
    */
    required init(coder aDecoder: NSCoder) {
        fatalError("init(coder:) has not been implemented")
    }
}
Here we create that subclass of SKNode and give it three
properties: the default button image, the active button image, and the action
that the button should take if pressed. Passing in two strings to the
constructor handles initializing the button images, and we also store a
reference to the button action function. Note of course that we hide the
“active” button by default, waiting for user interaction to reveal it.
After the call to super.init(), the button container has access to
methods inherited from SKNode. We then set the
userInteractionEnabled property to true, which lets this node
respond to input, and also add both buttons as children so they’ll be drawn to
the screen.
Now let’s deal with user input. We want to handle three cases: user touches the
button, user moves their finger around, user lifts their finger off the button.
Fortunately the user interaction methods provided by SKNode give us
exactly that, if you add the following three methods to the button class
definition.
This first method is pretty obvious: if a user starts touching the button, show the “active” state.
override func touchesMoved(touches: NSSet, withEvent event: UIEvent) {
    var touch: UITouch = touches.allObjects[0] as UITouch
    var location: CGPoint = touch.locationInNode(self)

    if defaultButton.containsPoint(location) {
        activeButton.hidden = false
        defaultButton.hidden = true
    } else {
        activeButton.hidden = true
        defaultButton.hidden = false
    }
}
This next method is a bit more complex. We have to determine if a user moved their finger on or off the button, so as to show the appropriate highlight state. Fortunately, SKNode-derived objects have a method containsPoint(), which lets us do some easy collision detection.
override func touchesEnded(touches: NSSet, withEvent event: UIEvent) {
    var touch: UITouch = touches.allObjects[0] as UITouch
    var location: CGPoint = touch.locationInNode(self)

    if defaultButton.containsPoint(location) {
        action()
    }

    activeButton.hidden = true
    defaultButton.hidden = false
}
Finally, we re-use the containsPoint() method described earlier in order to determine if the button was actually tapped. If it was, we call the “action” function that was provided to the constructor. Then we set the highlighted button state back to hidden, ready to be shown again on the next tap. Put it all together, and here’s how you’d use the button in a game: