Well, 2022 is nigh. Been seeing a lot of “end of the year” posts, so figured I’d write my own. Unfortunately,
my memory is completely shot, and I also don’t write in a diary or journal, so this entry’ll probably be a bit
on the short side.
First thing that comes to mind is that we collectively suffered thorugh an entire year of COVID. I have
been permanently working from home since March of 2020, so my own daily routine hasn’t changed much. I
roll out of bed and downstairs to my “office” for a commute. Vigilance in my own social circle relaxed
somewhat with the arrival of vaccines, although for indoor gatherings (church and stuff) we all
still wear masks. I got my own set of shots (Pfizer) in April, which was a bit of a relief. All three
kids got theirs as well, when they were able. My immediate family has stayed COVID free this year,
which I chalk down to both precaution and luck. I don’t really foresee the pandemic getting
any better in the new year, as cases are rising, and folks around here are basically pretending
it doesn’t exist.
While I continue to work from home, the kids have actually started going to in-person school this year.
We kept the twins out of preschool last year, so this is their first public school experience.
Fortunately, there’s not as much contention about making the kids wear masks in our district —
meaning that they all are wearing them. I don’t think I’d feel safe, otherwise. Even with the masks,
we’ve gotten quite a few notices of COVID transmission in our oldest’s classroom, and the kids still
bring home more conventional sicknesses. One silver lining from 2020 was that we all stayed healthy
throughout the winter, which has not been the case this year.
In spite of health concerns, we did take a few family vacations this year: one to the Florida panhandle
in early January, and then to the west coast of Michigan in July. The Florida trip was
based on the desire to go someplace slightly warmer and less snowy. Rentals are cheap
in the off season, and we reasoned that there would be fewer people as well. Well,
there were definitely fewer people — only northern crazies like us would be walking the
beaches in 40-50 degree weather. That being said, it was actually pretty nice. A lot
warmer than Ohio was, plus nice scenery in the form of the beach and ocean. We
also went to as many parks as we could in the area.
We went on the Michigan trip was with my wife’s family. It was basically a chance to
go to some beaches in slightly warmer weather. Similar to Florida, our goal was to
hit the beach every day — with varying degrees of success. One surprising
highlight was a “dune tour” sand buggy ride. The driver went a lot faster than one thought
would be safe, so the kids were initially pretty nervous, but eventually got over
their initial fear and started to enjoy it. They have actually been asking to go back,
so I think it was a success. My favorite location was Tunnel Park.
One bit of sadness we experienced this year was the death of the (almost 13-year old) family dog, Belle.
In October she randomly fell over and started seizing up. After slowly recovering, the seizures started
happening with more frequency, and finally were too much — she stopped breathing one night
while at home. I was sitting next to her while she passed, so hope that my presence was somewhat
comforting. As I told folks afterwards, dying at home with someone you love next to you is about
as good as any of us could ask for. After a brief mourning period, we ended up adopting a rescue puppy
that we named Stella. She’s quite the mutt, but has a good chunk of German Shepherd in her. It’s been
a challenge for both her and us to adapt to the new living situation.
In personal news, I turned 40 this year, which felt like a symbolic milestone. I’ve been dealing with
bouts of ennui, and some of the things I’ve focused on this year have been because I want
to push back on the feeling of being “old.” After running two marathons last year, and not performing
as well as I wanted, I tried hiring a coach for a few months in the spring. I think I was hoping that
I would get some sort of mystical insight into correct running form, or dramatically improve, or something
like that. What I ended up getting was interval workouts every other week, and a weekly running plan that
was similar to what I was already doing. After 4 months, I decided not to continue with the coaching,
mainly because I hate running on a track. I ended up following the same marathon training plan
that I did last year, and had more success at the staffed Columbus marathon (read my race recap here).
I also changed jobs this year, after almost 5 years in my second stint at CoverMyMeds. I think the impetus
was feeling bored/trapped/whatever due to my age, as well as stagnating in career growth at the company.
McKesson, the corporate overlord, also decided to merge CoverMyMeds more closely into its existing structure,
actually renaming their technology arm “CoverMyMeds.” So now that name refers to quite a few more people/offices
than it previously did. The “legacy” employees didn’t really like some of the changes that were imposed,
including changing (worse) benefits, and management basically said “our way or the highway.” So lots of
senior/long-tenured people left. I ended up leaving after my manager left, and I was passed over for both
a promotion and raise. I went to a company called Upstart, a fintech company that had opened a Columbus
office a while ago. It was my first time getting RSUs as part of the sign on process, which was kinda cool.
Unfortunately, my team’s onboarding process is not great, and over two months in I still feel like I don’t
know what’s going on, and am hardly contributing. Hopefully things change in the new year, or else I might
start grinding leetcode again in preparation for another round of interviews.
Tangential to work (at least in my mind) was paying off our mortgage this year. Work -> money, right?
Now this achievement isn’t quite as monumental as it seems, just because the mortgage (and by extension, house)
was pretty small to begin with. However, it does free up a good chunk of change to start investing elsewhere.
Maybe I can stop being a wage slave a few years earlier than I would otherwise. Nothing
like working your pain-free years away and retiring when your capacity to enjoy life has lessened.
I didn’t keep a list of consumed media this year. All I know is that I didn’t read as many books
as I should have, and played more video games than I should have. In fact, one of my goals
for 2022 is to keep better written records of my life. That way I might have the ability
to look back with more accuracy at what I accomplished, rather than guess at the end
of the year. I’d also like to get back into casually studying Japanese next year. I
have no illusions that I’ll ever be fluent, but I do have a decent base in the language,
and would like to continue to expand neural pathways. I’m going to continue to run next year,
with a focus on aerobic base and low heart rate training. I’d like to get a sub 3:00
marathon, but am limited in terms of the time available for training. If I was able
to train for one hour every day, at my current speeds my weekly distance would be in the
56 mile range. Throwing in a long run day could boost that into 60+ territory, which
might be enough. We’ll see what happens. I’d also like to find something enjoyable to do
for work, whether that’s grow into my current position or get a new one. I’m pretty
fortunate in that I can choose from a sizable pool of different companies to work at,
but my problem is that I have a hard time caring about the specific industry that
a company is in. And technology for technology’s sake is usually pretty boring as well.
Maybe I need to get out of web programming.
Thanks for reading this far. All in all, 2021 wasn’t too bad of a year, considering.
Happy New Year, and hopefully I’ll see you all in another 12 months.
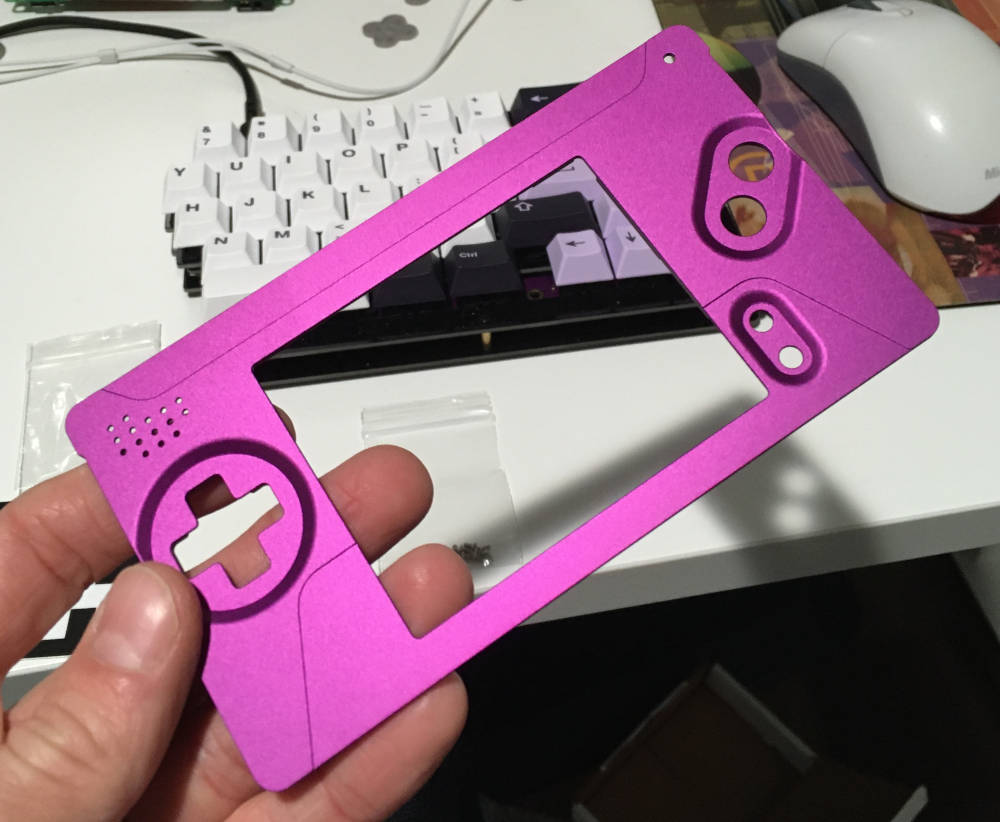
Another day, another random video game-related project. This time some products from Michigan-based Boxy Pixel
caught my eye — specifically, a machined aluminum faceplate for a “Game Boy Macro.” What is a Game Boy Macro,
you may ask? In effect, a decapitated Nintendo DS Lite. Since the DS can play Game Boy Advance games, and the
hinges for the upper screen are so fragile, some enterprising gamers have taken to completely
removing the top screen on broken DS units, and repurposing them as dedicated GBA consoles.
Now, normally these hacked machines would look a bit rough, but Boxy Pixel has designed
a replacement faceplate that looks very professional. It takes some design cues from the
Game Boy Advance SP, and has a modern design sensibility since it’s made of aluminum (truly, the metal
of our time).
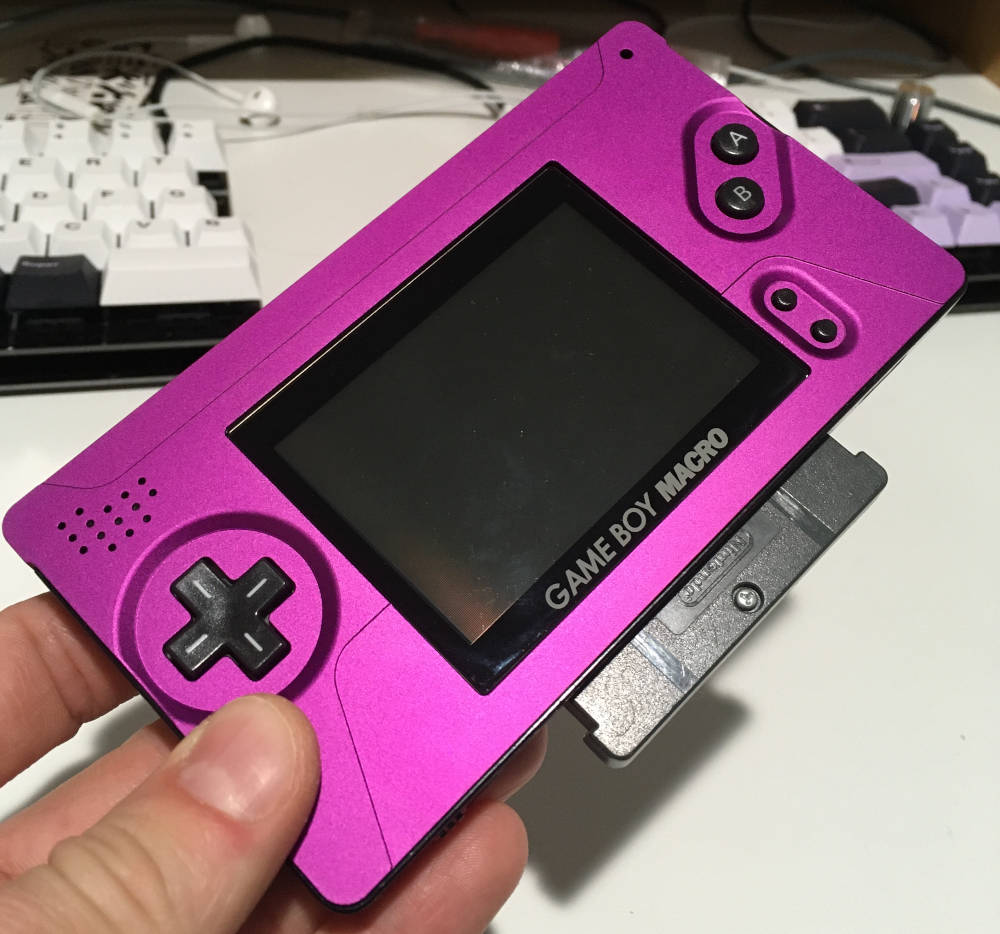
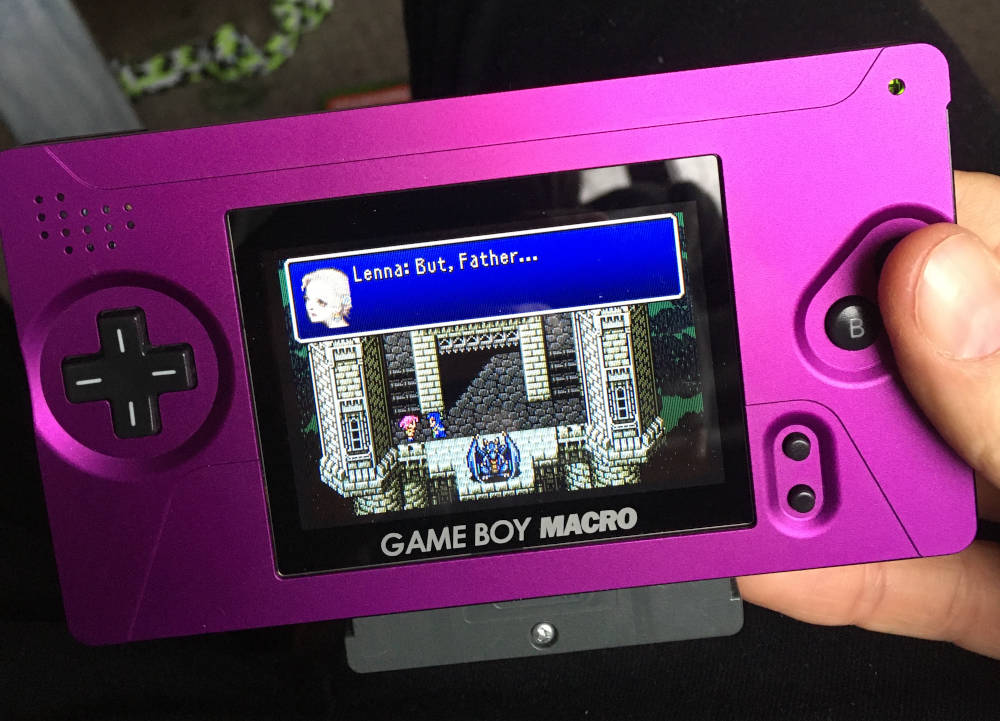
What you get from Boxy Pixel — the empty top shell. The completed product. Note that the GBA cart sticks out a bit from the bottom.With power. The screen looks great!
Now, there’s no reason that I needed to make a Macro. I have an original GBA that I modded with a Game Boy SP
backlit LCD, which could arguably be considered the “best” GBA. But it seemed like a cool
project, that wouldn’t be a huge time investment. So I poked around on eBay until
I found someone selling a DS Lite for parts. True to the seller’s word, the device did not power
on, and the charging port was disfigured to boot – I had to cut out a bent piece of metal
before I could even plug the thing in. Fortunately, the first result after searching
“ds lite no power” proved to be my solution. All I needed were a replacement fuse and charging port
from Ali Express, obtained for about $2.
Once the DS powered on again, I was able to follow the assembly guide
to complete the build. I had to reference a disassembly guide on iFixit once
or twice, but otherwise the instructions were pretty straightforward. The build requires some minor
soldering, but it was easily done, even with my limited skills.
So, after completing the project, what are my thoughts? Well, I knew that this would be completely
unnecessary for my video game collection, but was just something I had wanted to do for a while.
It’s definitely something for folks with more money than sense, as the saying goes. However,
I do like the size and weight of the device. It’s the same general form factor as the
original GBA, but quite a bit thinner and lighter, making it easier to play. It also
uses the built-in rechargable DS Lite battery, which is kinda nice — you don’t have to
swap AA batteries. The screen is also incredbily bright and vibrant.
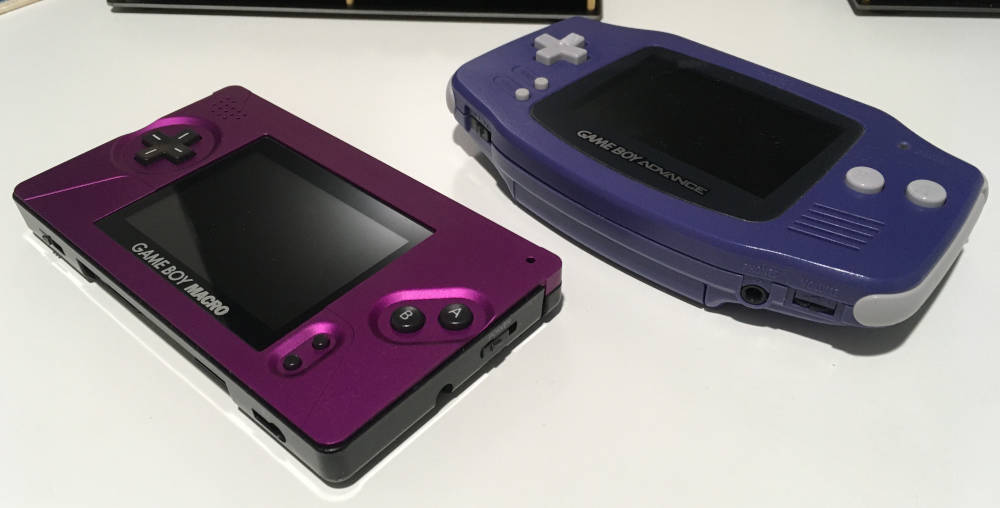
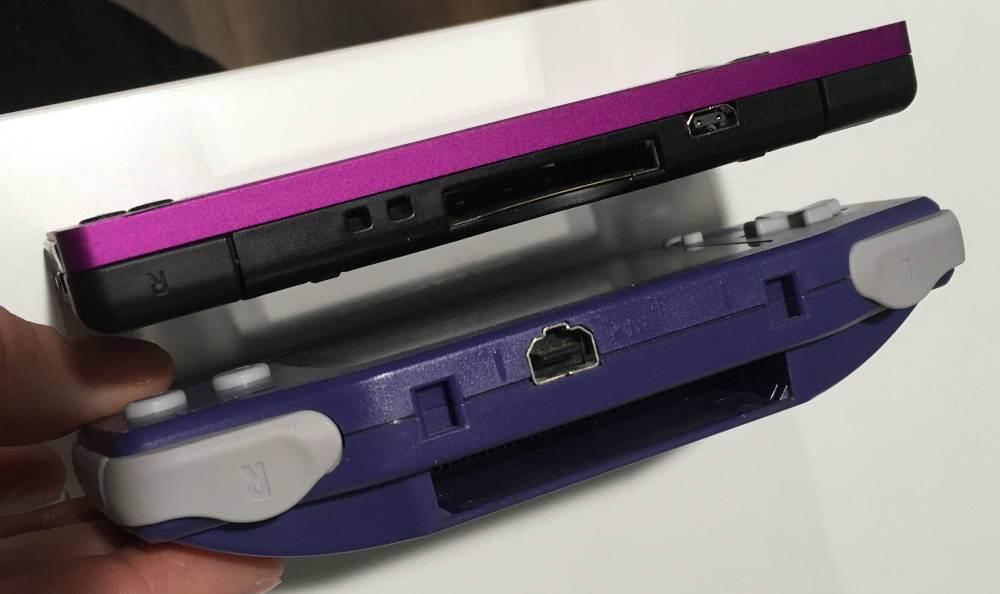
Side-by-side comparison between the Macro and an original GBA.The Macro is quite a bit thinner and lighter.
Any downsides? Well, one thing I had forgotten about was that the DS Lite didn’t have
enough room to completely insert a GBA cartridge, so the games stick out about
half an inch from the bottom of the system. Not a dealbreaker, but something
to keep in mind. Another minor annoyance is that the glass screen protector that Boxy Pixel
sells alongside the top shell is just a little too small, showing air gaps
between the glass and the aluminum. I’m hoping that it doesn’t accumulate lint and dust too
badly over time. The last thing I noticed was that there is just a hole in the top of the shell
to allow the charging/power LEDs to shine through — I would have expected the option
for a bit of diffusing plastic, so that the PCB wasn’t directly visible beneath. Perhaps
if I get motivated to open the machine back up again, I’ll squirt some hot glue in there.
These are all minor nitpicks. On the whole, I like the device, and the aluminum top shell really makes
it look like a mass-produced device. With people these days fawning over devices like the Analogue Pocket,
it’s kind of fun to be a bit of a contrarian.
So I ran the Columbus Marathon this year. It was the first time I’d run it since 2007, so only a gap of 14 years! I strained my right Achilles tendon pretty
badly after doing a half marathon right after the marathon in 2007, and didn’t have the knowledge of how to rehabilitate it successfully, so stopped running
for quite some time. In 2017 I got inspired by watching a documentary about the Barkely Marathons, and started running again, only to be stymied by runner’s
knee. The knee pain was really quite chronic, but after probably about two years of various physical therapy exercises, I was able to (mostly) banish it.
In 2019 I signed up for the half marathon, and was able to finish in 1:35 — not bad for a casual runner being out of training for quite a while.
I had been planning to run the full marathon the next year, but COVID quashed that idea. I ended up deciding to train as normal, then run 26 miles on
the day the marathon would have been, just for fun. I did that, and then also signed up for a timed “race” that used staggered starting times to
avoid potential COVID exposure. I “bonked” during both those runs; the first was due to dehydration, and the second was also due to dehydration. Dispite
that, I was able to improve my PR by a few minutes each time (3:40 for the first attempt, 3:31 for the second).
This year I had an advantage in that I ran a staffed race, so hydration stations were available throughout the course, without me having to carry my
own water bottle. I made a point of slowing down to drink at each station, and always chose Gatorade in order to get extra calories/electrolytes. While
the strategy wasn’t foolproof (I ran 0:30 slower than my target pace for the last 3 miles of the race), I was able to finish without walking, and got a
new PR (3:18).
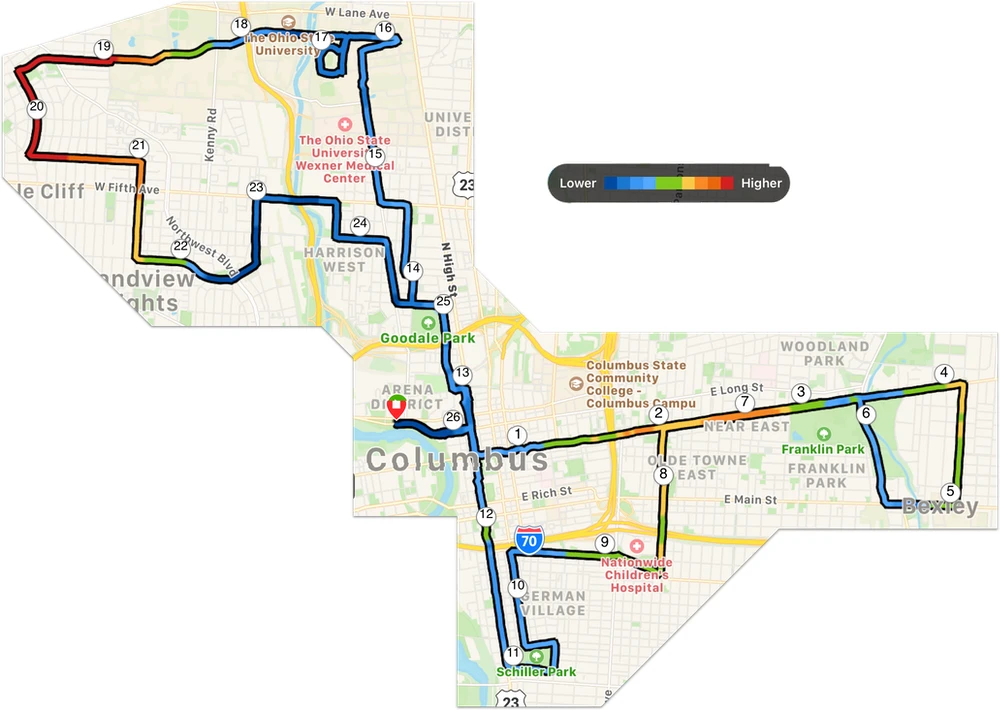
An elevation map of the 2021 Columbus Marathon.
After the race, I wanted to write down my thoughts of how it went; hopefully in order to do better next time. Here, in no particular order, are some
random observations about this year’s race:
Somehow strained my right calf on the 2 mile run the day before. It was coming off a two day rest, and I didn’t warm up my calves/ankles as much as
I normally would have. Fortunately a combination of stretching/ice multiple times that day seemed to help. I also wore calf compression sleeves
(which I originally wasn’t planning on wearing), which also helped — I didn’t have calf pain during the race.
I didn’t want to go too fast during the initial mile, running around other racers and tiring myself prematurely. I was quite a bit back from
the starting line, and ended up running 0:30 slower than my target pace.
About 7 miles in, I noticed that the ball of my right foot was getting painful. I had never had this sort of pain in training. The shoes I was
wearing were well broken in, so my guess is that it was a remnant of when my daughter jumped on my right foot while we were in a trampoline,
two days prior. The pain got progressively worse, but was not debilitating. However, it took me quite a while to recover afterwards.
I also ended up stopping at a port-a-potty around mile 8. The urge wasn’t terrible, but it would have been an additional source of discomfort
during the race. Note to self: always try to go beforehand.
Mile 18 was the hardest, due to wind/fatigue and an uphill grade. However, it was encouraging to pass other runners during this section.
When trying to push going over an incline on Nationwide Boulevard close to the end of the race, my right hamstring started cramping up. I had to
stop for a moment and stretch it out, allowing at least one other runner to pass me.
I didn’t spend any time stretching/recovering later on in the day after the race; this probably made my soreness worse over the next few days.
Base your Docker image off ruby:3-alpine, and add a few packages: build-base to compile native extensions,
nodejs for a JS runtime, yarn for JS dependency management (both required for Webpack), and sqlite-dev for
SQLite (the default database used in a new Rails installation).
FROM ruby:3-alpineRUN apk update
RUN apk add --no-cache\
build-base \
nodejs \
yarn \
sqlite-dev
WORKDIR /app
Build the image: docker build . --tag minimal_rails_image
Get in, loser! docker run --rm --interactive --tty --volume $(pwd):/app minimal_rails_image sh
Install the rails gem: gem install rails
Bootstrap a new Rails application: rails new .
Add tzinfo (Alpine doesn’t have it, apparently); remove the platforms: arg from the gem 'tzinfo-data' line.
I also had to remove the reference for it in the lockfile, before running bundle install again
Re-build the image: docker build . --tag minimal_rails_image
Run it (detached): docker run --rm --detach --name rails_container --volume $(pwd):/app --publish 3000:3000 minimal_rails_image.
You should now be able to hit localhost:3000 in your browser and see the “Welcome to Rails” splash page.
Rails console in running container: docker exec --interactive --tty rails_container rails c
Tail logs: docker logs --follow rails_container
Shell prompt: docker exec --interactive --tty rails_container sh
For some reason, recently I got it into my head that I wanted an Apple Newton keyboard. Who knows how these ideas get planted in ones mind? I have a general interest in retro Apple equipment, but have never actually owned, or even used, a Newton before. But the Newton keyboard accessory is just so small and cute, it has an appeal all of its own. A keyboard is still the primary interface method between a human and computer, too, so I figured I could justify getting one. The keyboards I currently own are fairly esoteric, so a Newton keyboard would be a fine addition to the collection.
The problem with actually using said keyboard is that the connector isn’t really compatible with anything. It uses a DIN-8 connector, which is the same physical size as Apple’s old ADB connector, but is not actually compatible with ADB. Before buying, I searched around on the ‘net and found a blog post by one Jim Lombardo, which showed how he used a 5V microcontroller to translate the output of the Newton keyboard to something that a modern computer can use. I had no experience with using a programmable microcontroller before, but the instructions/source code were all there, so figured I could suss it out.
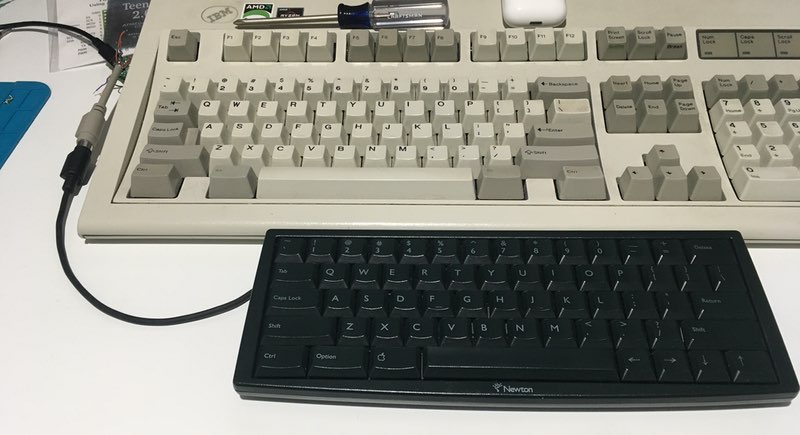
The Newton keyboard alongside my Model M. Notice the mess of wires where the DIY adapter is.
Fortuntely, everything worked without a hitch. A little solder and programming the controller got the keyboard working on my modern Macintosh. The one annoying part was the ugly mess of wires surrounding the DIN-8 -> USB transition. I wanted to enclose everything inside the keyboard, and then just have a USB cable visible, but as you might expect there was not enough room. I also didn’t really want to cut/destroy the old cable, even though I couldn’t see myself ever using it. Opening up the keyboard showed that the DIN-8 cable connects to the keyboard PCB via a 6 pin JST connector. Why couldn’t I disconnect the keyboard’s DIN-8 cable, then solder the JST connector directly to the microcontroller? As it turns out, I could do exactly that. I bought some cheapo connectors on Amazon, and they worked a treat. Now the thin microcontroller is stashed inside the keyboard, with only the USB cable visible. Success!
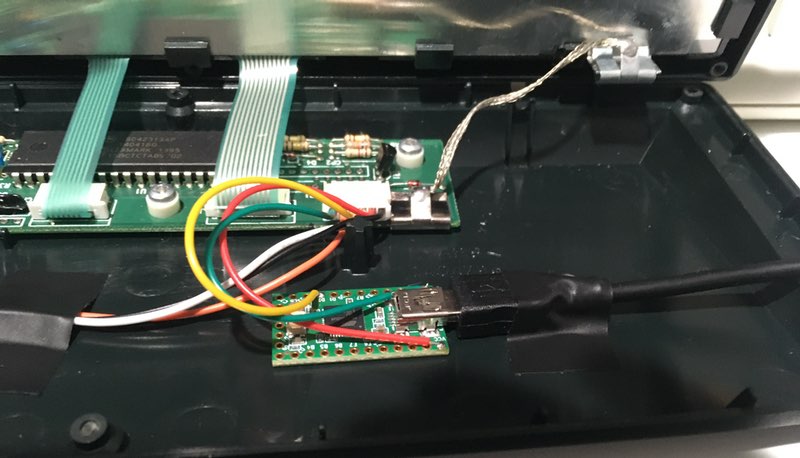
The JST connector soldered directly to the microcontroller inside the keyboard.
So, was all that work worth it? Mmmmmaybe. A Newton keyboard definitely a unique conversation piece. I’m sure I’ll get a few comments about it if/when I bring it back into my office. It’s very compact, as you might expect — even smaller than my 60% Happy Hacking Keyboard. So it frees up a lot of space on your desk. It even has an Apple/command key, which is perfect if you use a Macintosh. The keyboard does have a few downsides, of course: no function keys, and no escape key(!). Pretty funny to use this with my (work-provided) Macbook Pro, which also doesn’t have an escape key. It is only annoying sometimes — I map caps lock -> control, and use control+c with vim, etc. The other thing about the Newton keyboard is that it’s actually not that great of a keyboard. It uses rubber domes and in general is similar to other cheap keyboards you would get in the mid-90s. The keys are a bit stiff, and it takes a while to get used to. I probably wouldn’t use it as my main keyboard, but as a novelty it’s pretty fun.
To sum up: converting a Newton Keyboard to USB is relatively easy, and if you have any interest in this sort of DIY nonsense, I’d say give it a shot! I still have 9 JST connectors that I will never use for anything else, so if you start this project and want one, get in touch via the comments and I’ll mail you one for free.