Converting an Apple Newton keyboard from DIN-8 to USB
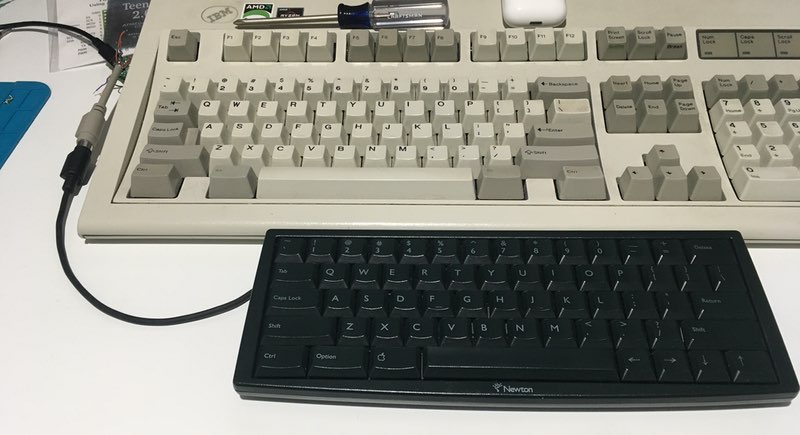
For some reason, recently I got it into my head that I wanted an Apple Newton keyboard. Who knows how these ideas get planted in ones mind? I have a general interest in retro Apple equipment, but have never actually owned, or even used, a Newton before. But the Newton keyboard accessory is just so small and cute, it has an appeal all of its own. A keyboard is still the primary interface method between a human and computer, too, so I figured I could justify getting one. The keyboards I currently own are fairly esoteric, so a Newton keyboard would be a fine addition to the collection.
The problem with actually using said keyboard is that the connector isn’t really compatible with anything. It uses a DIN-8 connector, which is the same physical size as Apple’s old ADB connector, but is not actually compatible with ADB. Before buying, I searched around on the ‘net and found a blog post by one Jim Lombardo, which showed how he used a 5V microcontroller to translate the output of the Newton keyboard to something that a modern computer can use. I had no experience with using a programmable microcontroller before, but the instructions/source code were all there, so figured I could suss it out.
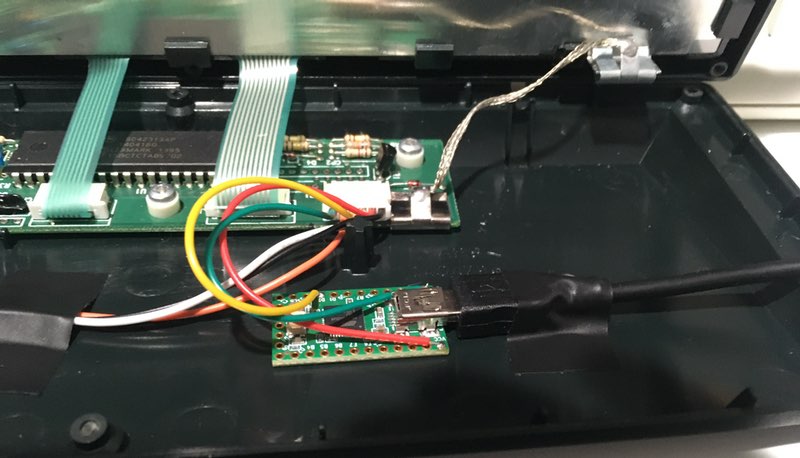
Fortuntely, everything worked without a hitch. A little solder and programming the controller got the keyboard working on my modern Macintosh. The one annoying part was the ugly mess of wires surrounding the DIN-8 -> USB transition. I wanted to enclose everything inside the keyboard, and then just have a USB cable visible, but as you might expect there was not enough room. I also didn’t really want to cut/destroy the old cable, even though I couldn’t see myself ever using it. Opening up the keyboard showed that the DIN-8 cable connects to the keyboard PCB via a 6 pin JST connector. Why couldn’t I disconnect the keyboard’s DIN-8 cable, then solder the JST connector directly to the microcontroller? As it turns out, I could do exactly that. I bought some cheapo connectors on Amazon, and they worked a treat. Now the thin microcontroller is stashed inside the keyboard, with only the USB cable visible. Success!
So, was all that work worth it? Mmmmmaybe. A Newton keyboard definitely a unique conversation piece. I’m sure I’ll get a few comments about it if/when I bring it back into my office. It’s very compact, as you might expect — even smaller than my 60% Happy Hacking Keyboard. So it frees up a lot of space on your desk. It even has an Apple/command key, which is perfect if you use a Macintosh. The keyboard does have a few downsides, of course: no function keys, and no escape key(!). Pretty funny to use this with my (work-provided) Macbook Pro, which also doesn’t have an escape key. It is only annoying sometimes — I map caps lock -> control, and use control+c with vim, etc. The other thing about the Newton keyboard is that it’s actually not that great of a keyboard. It uses rubber domes and in general is similar to other cheap keyboards you would get in the mid-90s. The keys are a bit stiff, and it takes a while to get used to. I probably wouldn’t use it as my main keyboard, but as a novelty it’s pretty fun.
To sum up: converting a Newton Keyboard to USB is relatively easy, and if you have any interest in this sort of DIY nonsense, I’d say give it a shot! I still have 9 JST connectors that I will never use for anything else, so if you start this project and want one, get in touch via the comments and I’ll mail you one for free.
Comments